在相机应用中,实时贴纸、实时瘦脸是比较常见的功能,它们的实现基础是人脸关键点检测。本文主要介绍,如何在 GPUImage 中检测人脸关键点。
前言
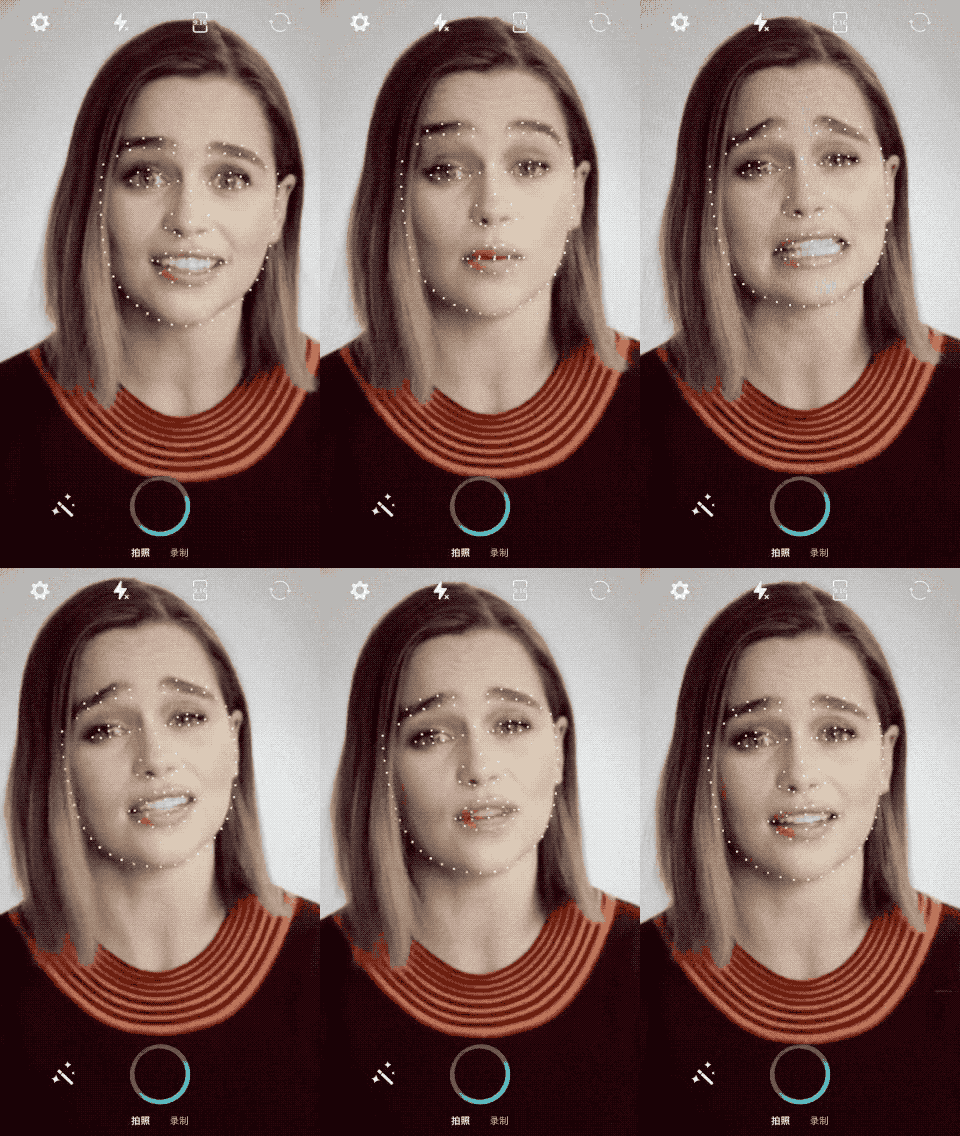
我们要通过某一种方式,获取视频中每一帧的人脸关键点,然后通过 OpenGL ES 将关键点绘制到屏幕上。最终呈现效果如下:

这里分为两个步骤:关键点获取、关键点绘制。
一、关键点获取
在苹果自带的 SDK 中,已经包含了一部分的人脸识别功能。比如在 CoreImage、AVFoundation 中,就提供了相关的接口。但是,它们提供的接口功能有限,并不具备人脸关键点检测功能。
我们要在视频中进行实时的人脸关键点检测,还需要借助第三方的库。这里主要介绍两种方式:
- Face++
- OpenCV + Stasm
1、Face++
1、简介
Face++ 的人脸关键点 SDK 是收费的,但是它也提供免费试用的版本。
在免费试用的版本中,试用的 API Key 每天可以发起 5 次联网授权,每次授权的时长为 24 小时。也就是说,在不删除 APP 的情况下,只要测试设备不超过 5 台,就可以一直使用下去。
这对于开发者来说还是非常友好的,而且 Face++ 的注册集成也比较简单,建议大家都尝试一下。
2、如何集成
人脸关键点 SDK 的集成可以参照 官方文档 ,先注册再下载 SDK 压缩包,压缩包里有详细的集成步骤。
3、如何使用
人脸关键点 SDK 的使用主要分为三步:
第一步:发起联网授权
授权的操作不一定发起网络请求,而是会先检查本地的授权信息是否过期,过期了才会发起网络请求。
1
2
3
4
5
6
7
8
9
10
11
12
| @weakify(self);
[MGFaceLicenseHandle licenseForNetwokrFinish:^(bool License, NSDate *sdkDate) {
@strongify(self);
dispatch_async(dispatch_get_main_queue(), ^{
if (License) {
[[UIApplication sharedApplication].keyWindow makeToast:@"Face++ 授权成功!"];
[self setupFacepp];
} else {
[[UIApplication sharedApplication].keyWindow makeToast:@"Face++ 授权失败!"];
}
});
}];
|
第二步:初始化人脸检测器
授权成功后,开始人脸检测器的初始化。初始化过程会进行模型数据加载,然后对识别模式、视频流格式、视频旋转角度等进行设置。
1
2
3
4
5
6
7
8
9
| NSString *modelPath = [[NSBundle mainBundle] pathForResource:KMGFACEMODELNAME
ofType:@""];
NSData *modelData = [NSData dataWithContentsOfFile:modelPath];
self.markManager = [[MGFacepp alloc] initWithModel:modelData
faceppSetting:^(MGFaceppConfig *config) {
config.detectionMode = MGFppDetectionModeTrackingRobust;
config.pixelFormatType = PixelFormatTypeNV21;
config.orientation = 90;
}];
|
第三步:检测视频帧
人脸检测器初始化成功后,可以对视频流每一帧进行检测,这里传入的是 CMSampleBufferRef 类型的数据。由于顶点坐标的范围是 -1 ~ 1,所以还需要根据当前的视频尺寸比例,对识别的结果进行坐标转换。
1
2
3
4
5
6
7
8
9
10
11
12
13
14
15
16
17
18
19
20
21
22
23
24
25
26
27
28
29
30
31
32
33
34
35
36
37
38
39
| - (float *)detectInFaceppWithSampleBuffer:(CMSampleBufferRef)sampleBuffer
facePointCount:(int *)facePointCount
isMirror:(BOOL)isMirror {
if (!self.markManager) {
return nil;
}
MGImageData *imageData = [[MGImageData alloc] initWithSampleBuffer:sampleBuffer];
[self.markManager beginDetectionFrame];
NSArray *faceArray = [self.markManager detectWithImageData:imageData];
NSInteger faceCount = [faceArray count];
int singleFaceLen = 2 * kFaceppPointCount;
int len = singleFaceLen * (int)faceCount;
float *landmarks = (float *)malloc(len * sizeof(float));
for (MGFaceInfo *faceInfo in faceArray) {
NSInteger faceIndex = [faceArray indexOfObject:faceInfo];
[self.markManager GetGetLandmark:faceInfo isSmooth:YES pointsNumber:kFaceppPointCount];
[faceInfo.points enumerateObjectsUsingBlock:^(NSValue *value, NSUInteger idx, BOOL *stop) {
float x = (value.CGPointValue.y - self.sampleBufferLeftOffset) / self.videoSize.width;
x = (isMirror ? x : (1 - x)) * 2 - 1;
float y = (value.CGPointValue.x - self.sampleBufferTopOffset) / self.videoSize.height * 2 - 1;
landmarks[singleFaceLen * faceIndex + idx * 2] = x;
landmarks[singleFaceLen * faceIndex + idx * 2 + 1] = y;
}];
}
[self.markManager endDetectionFrame];
if (faceArray.count) {
*facePointCount = kFaceppPointCount * (int)faceCount;
return landmarks;
} else {
free(landmarks);
return nil;
}
}
|
2、OpenCV + Stasm
1、简介
OpenCV 是一个开源的跨平台计算机视觉库,实现了图像处理方面的很多通用算法。Stasm 是用于检测人脸特征的开源算法库,依赖于 OpenCV 。
我们知道,iPhone 屏幕的刷新频率可以达到 60 帧每秒。在相机预览时,出于功耗方面的考虑,一般会将帧率限制到 30 帧每秒左右,且不会引起明显的卡顿。
所以,我们要对每一帧数据进行识别,则要求每一帧的识别时间要小于 1 / 30 秒,否则图像数据的渲染操作就要等待识别结果,从而导致帧率下降,引起卡顿。
遗憾的是,采用 OpenCV + Stasm 的方式,每一帧的识别时间是超过 1 / 30 秒的。它或许更适合用来做静态图片的识别。
所以也更推荐使用 Face++ 的方式。
2、如何集成
OpenCV 通过 CocoPods 的方式来引入:
OpenCV2-contrib 相比于 OpenCV2 多包含了一些拓展包,比如 face 模块,而 Stasm 算法库需要依赖 face 模块。
Stasm 算法库可以从 这个地址 下载,需要将 stasm 和 haarcascades 文件夹都加入工程中。
3、如何使用
人脸关键点的识别主要通过调用 stasm_search_single 函数来实现。
由于这个方法的检测时间较长,因此我们在将视频帧数据传入之前,会先做单通道化、尺寸压缩等处理。这样的话, Stasm 拿到的每一帧的数据量会减少,可以有效地缩短检测的时长,但相应地也会损失检测的精度。
关键的代码:
1
2
3
4
5
6
7
8
9
10
11
12
13
14
15
16
17
18
19
20
21
22
23
24
25
26
27
28
29
30
31
32
33
34
35
36
37
38
39
40
41
42
43
44
45
46
47
48
49
50
51
52
53
54
55
56
57
58
59
60
| - (float *)detectInOpenCVWithSampleBuffer:(CMSampleBufferRef)sampleBuffer
facePointCount:(int *)facePointCount
isMirror:(BOOL)isMirror {
cv::Mat cvImage = [self grayMatWithSampleBuffer:sampleBuffer];
int resultWidth = 250;
int resultHeight = resultWidth * 1.0 / cvImage.rows * cvImage.cols;
cvImage = [self resizeMat:cvImage toWidth:resultHeight];
cvImage = [self correctMat:cvImage isMirror:isMirror];
const char *imgData = (const char *)cvImage.data;
int foundface;
int len = 2 * stasm_NLANDMARKS;
float *landmarks = (float *)malloc(len * sizeof(float));
int imgCols = cvImage.cols;
int imgRows = cvImage.rows;
const char *xmlPath = [[NSBundle mainBundle].bundlePath UTF8String];
int stasmActionError = stasm_search_single(&foundface,
landmarks,
imgData,
imgCols,
imgRows,
"",
xmlPath);
if (!stasmActionError) {
printf("Error in stasm_search_single: %s\n", stasm_lasterr());
}
cvImage.release();
if (foundface) {
for (int index = 0; index < len; ++index) {
if (index % 2 == 0) {
float scale = (self.videoSize.height / self.videoSize.width) / (16.0 / 9.0);
scale = MAX(1, scale);
landmarks[index] = (landmarks[index] / imgCols * 2 - 1) * scale;
} else {
float scale = (16.0 / 9.0) / (self.videoSize.height / self.videoSize.width);
scale = MAX(1, scale);
landmarks[index] = (landmarks[index] / imgRows * 2 - 1) * scale;
}
}
*facePointCount = stasm_NLANDMARKS;
return landmarks;
} else {
free(landmarks);
return nil;
}
}
|
二、关键点绘制
通过上面的步骤,我们已经有了顶点数据,区别只是两种方式的顶点数量不同。
顶点数据的绘制,要在 GPUImageFilter 中进行。我们要自定义一个滤镜,然后在这个滤镜中实现人脸关键点的绘制逻辑。
在 GPUImageFilter 中,渲染的流程是在 -renderToTextureWithVertices:textureCoordinates: 这个方法里执行的。因此在自定义的滤镜中,我们需要重写这个方法。
在这个方法里,我们需要做两件事情,一是将输入的纹理原封不动地绘制,二是对人脸关键点的绘制。
纹理的绘制使用的是三角形图元,人脸关键点的绘制使用的是点图元,因此我们需要分成两次绘制。在原来的绘制方法中,已经有了纹理的绘制逻辑。所以,我们只需要在纹理绘制结束后,加上人脸关键点的绘制。
完整的重写后的方法:
1
2
3
4
5
6
7
8
9
10
11
12
13
14
15
16
17
18
19
20
21
22
23
24
25
26
27
28
29
30
31
32
33
34
35
36
37
38
39
40
41
42
43
44
45
46
47
48
| - (void)renderToTextureWithVertices:(const GLfloat *)vertices
textureCoordinates:(const GLfloat *)textureCoordinates {
if (self.preventRendering)
{
[firstInputFramebuffer unlock];
return;
}
[GPUImageContext setActiveShaderProgram:filterProgram];
outputFramebuffer = [[GPUImageContext sharedFramebufferCache] fetchFramebufferForSize:[self sizeOfFBO] textureOptions:self.outputTextureOptions onlyTexture:NO];
[outputFramebuffer activateFramebuffer];
if (usingNextFrameForImageCapture)
{
[outputFramebuffer lock];
}
[self setUniformsForProgramAtIndex:0];
glClearColor(backgroundColorRed, backgroundColorGreen, backgroundColorBlue, backgroundColorAlpha);
glClear(GL_COLOR_BUFFER_BIT);
glActiveTexture(GL_TEXTURE2);
glBindTexture(GL_TEXTURE_2D, [firstInputFramebuffer texture]);
glUniform1i(filterInputTextureUniform, 2);
glUniform1i(self.isPointUniform, 0);
glVertexAttribPointer(filterPositionAttribute, 2, GL_FLOAT, 0, 0, vertices);
glVertexAttribPointer(filterTextureCoordinateAttribute, 2, GL_FLOAT, 0, 0, textureCoordinates);
glDrawArrays(GL_TRIANGLE_STRIP, 0, 4);
if (self.facesPoints) {
glUniform1i(self.isPointUniform, 1);
glUniform1f(self.pointSizeUniform, self.sizeOfFBO.width * 0.006);
glVertexAttribPointer(filterPositionAttribute, 2, GL_FLOAT, 0, 0, self.facesPoints);
glDrawArrays(GL_POINTS, 0, self.facesPointCount);
}
[firstInputFramebuffer unlock];
if (usingNextFrameForImageCapture)
{
dispatch_semaphore_signal(imageCaptureSemaphore);
}
}
|
在绘制点图元的时候,可以通过对 gl_PointSize 进行赋值,来指定点的大小。然后在外部通过 uniform 变量传值的方式进行控制。
顶点着色器代码:
1
2
3
4
5
6
7
8
9
10
11
12
13
14
15
| precision highp float;
attribute vec4 position;
attribute vec4 inputTextureCoordinate;
varying vec2 textureCoordinate;
uniform float pointSize;
void main()
{
gl_Position = position;
gl_PointSize = pointSize;
textureCoordinate = inputTextureCoordinate.xy;
}
|
由于两次渲染的逻辑是独立的,所以一般来说,应该使用不同的 Shader 来实现。但由于这里的渲染逻辑比较简单,所以直接将两次渲染的逻辑都放到同一个 Shader 中。这也可以避免 Program 的来回切换,然后用一个 uniform 变量来判断当前的绘制类型。
片段着色器代码:
1
2
3
4
5
6
7
8
9
10
11
12
13
14
15
16
| precision highp float;
varying vec2 textureCoordinate;
uniform sampler2D inputImageTexture;
uniform int isPoint;
void main()
{
if (isPoint != 0) {
gl_FragColor = vec4(1.0, 1.0, 1.0, 1.0);
} else {
gl_FragColor = texture2D(inputImageTexture, textureCoordinate);
}
}
|
最后,只需要将这个滤镜加入到滤镜链里,就可以看到人脸关键点的绘制效果了。
源码
请到 GitHub 上查看完整代码。
参考

